10 Floor Plan Mistakes That Will Cost You Thousands (And How to Catch Them Before Construction)
Your floor plan looks great on screen. The rooms are labeled, the dimensions look right, and the architect says it's ready to build. So you sign off, pull the permit, and the builder breaks ground.
Then you walk the framing for the first time.
"Why is this hallway so long?" "Where am I supposed to put the dresser?" "Wait - the front door opens directly into the living room?"
I've been building custom homes for over 15 years, and I see these reactions constantly. Not because the architect is bad or the builder made an error - but because floor plans are deceptively hard to read. What looks fine as a 2D drawing on a 24-inch screen becomes a real problem when it's framed with 2x4s and you're standing inside it.
The good news: every single one of these mistakes can be caught on paper - before a wall goes up and it costs real money to fix.
A floor plan mistake doesn't cost anything to fix on paper. It costs thousands to fix in lumber.
1
The Front Door Opens Into a Direct Sight Line to the Entire House
Cost to fix: $2,000 - $8,000
You open the front door and can see straight through the living room, past the kitchen, and out the back windows. It sounds "open" and "airy" on paper. In reality, there's no sense of arrival, no privacy, and every mess in the kitchen is on display the moment someone rings the doorbell.

The worst version of this: the front door opens directly into the living room with no foyer, no transition space, and nowhere to set down keys or kick off shoes. You're standing in someone's living room the moment you cross the threshold.
- Add a foyer or entry alcove - even 4x6 feet creates a sense of arrival
- Angle the entry so the sight line hits a feature wall, not the kitchen sink
- Use a partial wall or built-in to create visual separation
- Position a coat closet to act as a buffer between entry and living space
Production home builders love the "door opens to open concept" layout because it saves framing costs. But it's one of the most common regrets I hear from homeowners a year after move-in. A small foyer costs $2,000 to $4,000 to add during design. It costs $6,000 to $10,000 to add after framing.
2
Bedrooms That Can't Fit Real Furniture
Cost to fix: $3,000 - $12,000
The plan says "Bedroom 3 - 11x11." That sounds fine until you try to fit a queen bed, two nightstands, and a dresser. Suddenly you can't open the closet door, and the only outlet is behind the bed.
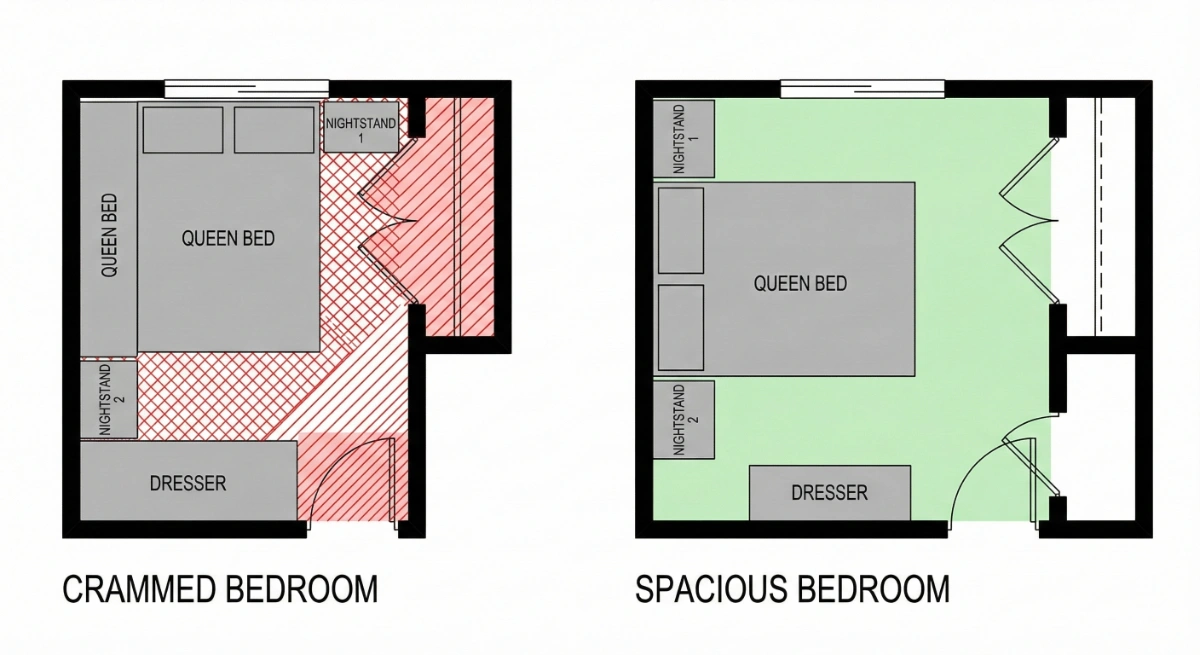
The problem isn't the square footage - it's the proportions and placement. A 10x12 room fits furniture differently than an 11x11 room with the same area. Window placement, door swing, and closet location dictate where furniture can actually go.
- Draw furniture to scale on the floor plan (bed, nightstands, dresser)
- Check that closet doors clear the bed when open
- Verify outlets aren't behind furniture
- Make sure the bedroom door doesn't swing into the dresser
- 11x12 minimum for a queen bed room, 12x14 minimum for king
I tell every homeowner to go to the architect with their furniture dimensions. Not "a bed" - your actual bed, or the bed you plan to buy. A king bed is 76x80 inches. A Hemnes dresser from IKEA is 63 inches wide. If the plan doesn't fit your real furniture, it doesn't work. I've had homeowners move into a $400,000 house and discover their bed only fits in one possible position.
3
The Kitchen Work Triangle Is Broken
Cost to fix: $5,000 - $15,000
The work triangle - sink, stove, refrigerator - is the foundation of kitchen efficiency. When any two points are too far apart or too close together, the kitchen becomes frustrating to cook in every single day for the life of the house.
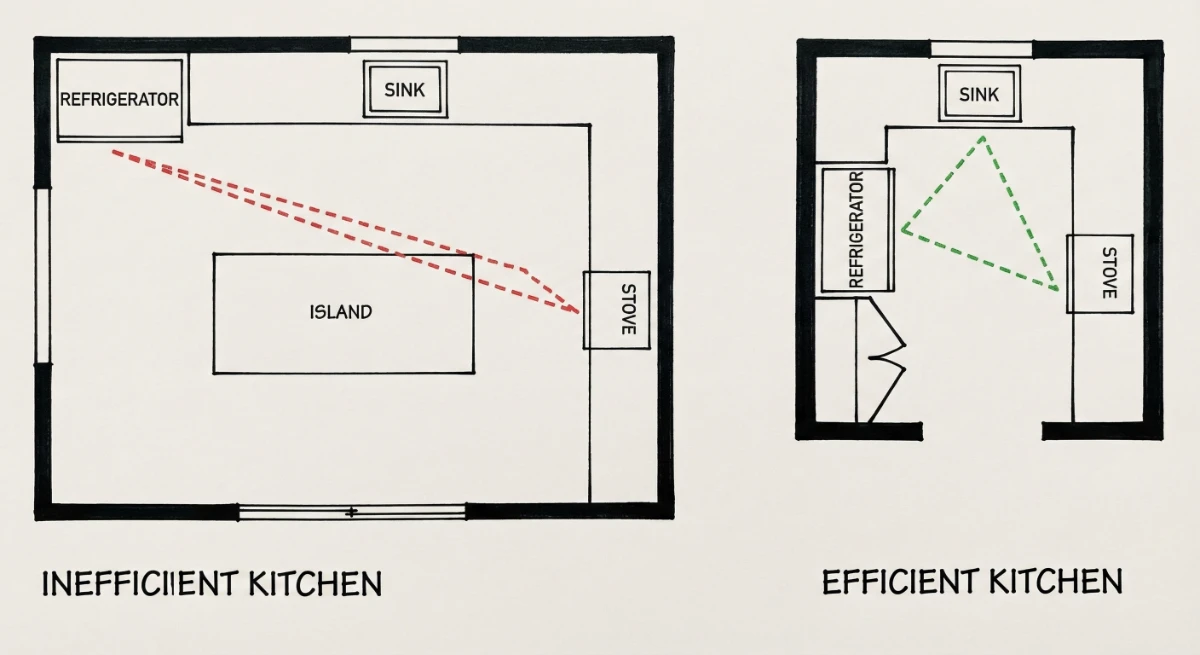
The worst offenders: kitchens where the refrigerator is 20 feet from the stove, island-heavy layouts where you have to walk around the island to get from sink to stove, and galley kitchens where the dishwasher blocks the walkway when open.
| Work triangle rule | Ideal range | Red flag |
|---|---|---|
| Each triangle leg | 4 - 9 feet | Under 4 or over 9 feet |
| Total triangle perimeter | 13 - 26 feet | Over 26 feet |
| Traffic paths crossing triangle | 0 | Main walkway cuts through |
| Island clearance (all sides) | 42 - 48 inches | Under 36 inches |
- Measure the three legs of the triangle on your plan (sink-stove-fridge)
- Ensure no leg is shorter than 4 feet or longer than 9 feet
- Check that the main traffic path (kitchen entry to backyard, etc.) doesn't cross the triangle
- Verify the island doesn't create a bottleneck - 42" clearance minimum, 48" ideal
4
No Mudroom or Drop Zone Near the Entry You Actually Use
Cost to fix: $4,000 - $10,000
Here's a reality check: nobody uses the front door. You come in from the garage. Your kids come in from the garage. The dog comes in from the garage. And what's between your garage and your kitchen? Usually nothing. No bench, no hooks, no shoe storage. Just a blank wall and a pile of sneakers on the floor.
What most plans have
Garage door opens directly into the kitchen or a narrow hallway.
No landing zone. Bags, shoes, and coats end up on the counter and floor.
Beautiful front foyer that no one uses.
What you actually need
Mudroom between garage and kitchen with hooks, bench, and shoe cubbies.
6x8 feet minimum. Add a utility sink if you have kids or dogs.
Locate the laundry here if possible - dirty sports gear goes straight into the wash.
The mudroom is the most undervalued room in custom home design. I've never - not once - had a homeowner say "I wish we'd made the mudroom smaller." But I've heard "I wish we'd actually built a mudroom" hundreds of times. If your plan doesn't have one, add it now. Borrow the space from the oversized laundry room or the formal dining room nobody uses.
5
Door Swings That Conflict With Each Other or Block Rooms
Cost to fix: $500 - $2,000 per door
This one is invisible on floor plans unless you know what to look for. Two doors in a hallway that bang into each other when opened simultaneously. A bathroom door that blocks access to the shower when open. A closet door that hits the bedroom door.
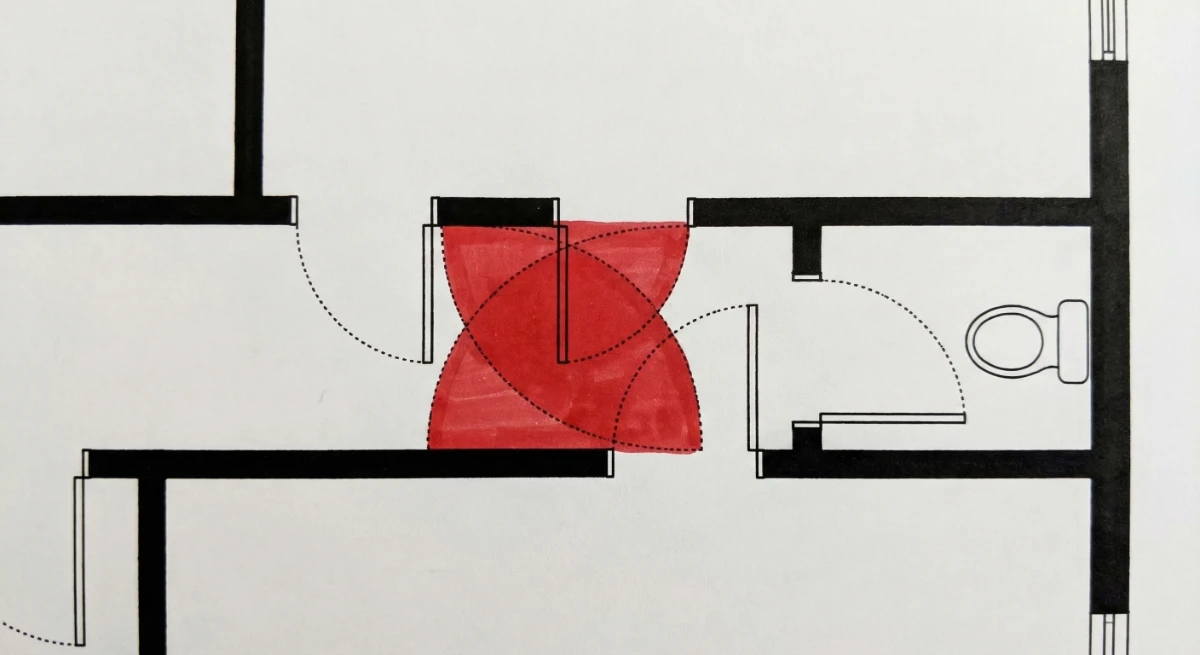
On a floor plan, door swings are shown as small arcs. Most homeowners skip right over them. But every arc represents the path that door travels - and if two arcs overlap, you have a conflict.
- Trace every door arc on the plan - check for overlaps
- Verify no door blocks a toilet, vanity, or shower when open
- Ensure the master bathroom door doesn't open into the bed area when someone is sleeping
- Consider pocket doors or barn doors for tight spaces (bathrooms, pantries, closets)
- Check that all light switches are on the latch side of the door, not behind it
The light switch rule is the one that catches the most homeowners. Walk through every room on the plan mentally: you open the door, reach for the light switch with your right hand - is it there, or is it behind the door? If the switch is on the hinge side, you have to reach around the open door to turn on the light. It's a small thing that will annoy you every single day.
Catching These Mistakes Before Framing Starts?
The Home Building Checklist Bundle includes phase-by-phase checklists covering everything from plan review to final walkthrough - so nothing slips through the cracks.
See the Checklist Bundle
6
The Master Bedroom Is Next to the Living Room (Noise Disaster)
Cost to fix: $8,000 - $25,000
On paper, putting the master suite adjacent to the main living area seems efficient. In practice, you're trying to sleep while your teenagers are watching movies at full volume ten feet away with one wall between you.
Sound travels through walls - especially the interior walls in most new construction, which are just two layers of 1/2" drywall on 2x4 studs with no insulation. Without a buffer zone, you can hear conversations, TV, and even footsteps from the living room clearly in the master bedroom.
- Place a buffer room between the master and living areas (closet, bathroom, laundry)
- If direct adjacency is unavoidable, plan for soundproofing (insulated interior walls, staggered studs, or resilient channel)
- Avoid placing the bed wall directly against the living room TV wall
- Consider a "split floor plan" where the master is on the opposite side of the house from secondary bedrooms
After-the-fact soundproofing means tearing out drywall, adding insulation, installing resilient channel or double drywall, and refinishing. In the master bedroom? That's $4,000 to $8,000 per wall. On paper, relocating a room costs nothing. After construction, it's a five-figure renovation.
7
Not Enough Wall Space for Furniture and Art
Cost to fix: $2,000 - $6,000
Open concept is beautiful. Floor-to-ceiling windows are gorgeous. But somewhere between the glass, the doorways, and the pass-throughs, you've eliminated every usable wall surface. Where does the TV go? Where do you put a bookshelf? Where does the couch lean against?

I've seen living rooms with four walls and not a single stretch longer than 5 feet without a window, door, or opening. The homeowner ends up putting the TV in the corner at an awkward angle or blocking a window with a bookshelf.
- Identify where your TV will go - you need at least 8 feet of uninterrupted wall
- Plan couch placement - it needs a wall behind it or a room large enough for it to float
- Leave at least one wall in every room without windows for furniture/art
- Balance windows and walls - you can have plenty of light without glass on every surface
8
Bathrooms Visible From Public Spaces
Cost to fix: $3,000 - $10,000
Open the powder room door from the dining table and your guests see the toilet. The master bathroom is visible from the hallway. The guest bath opens directly into the living room.
On a floor plan, this reads fine - the bathroom is "conveniently located." In real life, it's a privacy disaster. Nobody wants a direct line of sight to a toilet from where they eat or entertain.
Privacy failures
Powder room door opens toward dining table or kitchen island.
Toilet visible from hallway when bathroom door is open.
Master bath entrance is in view of the bedroom entry.
Privacy solutions
Powder room tucked around a corner or in a small alcove.
Toilet compartment or privacy wall inside larger bathrooms.
Master bath accessed through a short corridor or walk-in closet.
The "toilet sight line test" is simple: on your floor plan, draw a straight line from the toilet through the open bathroom door. Where does that line land? If it hits a dining chair, a couch, or the front entry, you have a problem. Move the door, reorient the toilet, or add a short privacy wall. It costs $300 on paper and $5,000 after framing.
9
No Pantry, or a Pantry That's Too Small to Be Useful
Cost to fix: $3,000 - $8,000
A 2x3-foot pantry closet isn't a pantry - it's a shelf behind a door. A real, functional pantry is one of the highest-value features in a custom home, and yet floor plans consistently undersize or eliminate it entirely to make the kitchen island 6 inches bigger.
- Walk-in pantry should be at least 4x6 feet with shelving on three walls
- Locate it adjacent to the kitchen - not across a hallway
- Borrow space from an oversized laundry room or that formal dining room you'll use twice a year
- Include a countertop inside the pantry for a coffee station or small appliance storage
For more on where to find hidden space for features like this, read my article on where your square footage is secretly wasted.
10
Ignoring How the Sun Moves Through the House
Cost to fix: $5,000 - $20,000
Your plan looks great. Then you move in and discover the master bedroom gets blinding west sun at 7pm in summer, the kitchen is dark all morning because it faces north, and the living room turns into a greenhouse every afternoon because of the floor-to-ceiling south-facing windows with no overhang.
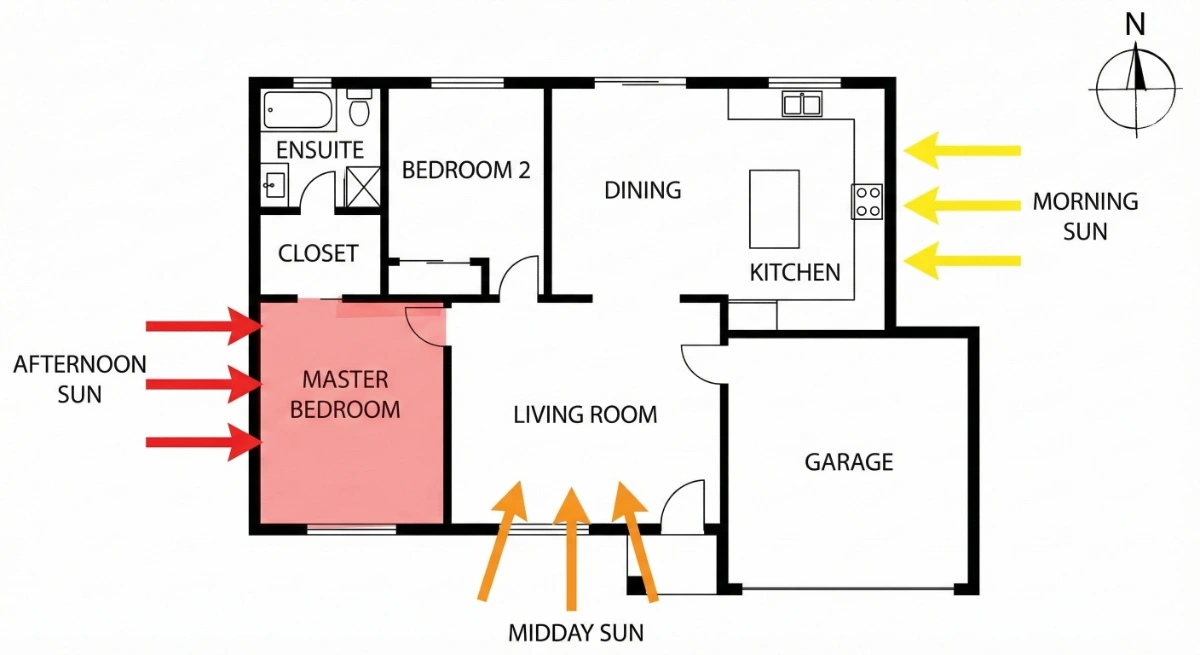
Solar orientation is the most overlooked factor in floor plan design. It costs nothing to orient rooms correctly - but fixing it after construction means adding window treatments, exterior shading, or even replacing windows.
| Room | Best orientation | Why |
|---|---|---|
| Kitchen / breakfast area | East or southeast | Morning light while cooking, avoids afternoon heat |
| Living room / family room | South | Consistent daylight, passive solar gain in winter |
| Master bedroom | East or northeast | Gentle morning light, cool in the evening |
| Home office | North | Consistent, glare-free indirect light all day |
| Garage | North or west | No direct sun (not a living space) |
- Orient your plan to your actual lot - mark north on the floor plan
- Position bedrooms east (morning light) and living areas south
- Avoid large west-facing windows in bedrooms (blinding sunset heat)
- Add roof overhangs on south-facing windows (blocks high summer sun, allows low winter sun)
- Plant deciduous trees on the west side for natural summer shading
I've seen homeowners spend $3,000 on motorized blinds for west-facing bedroom windows that never should have been that large. And $15,000 on a covered patio to shade south-facing glass that should have had a 3-foot overhang from the start. Ask your architect to show you a sun path diagram for your specific lot orientation. It takes 10 minutes and can save you thousands.
Reviewing Your Floor Plan?
The Home Building Checklist Bundle includes 12+ phase-by-phase checklists covering everything from plan review through final walkthrough - plus a budget tracker and materials list template.
Get the Checklist BundleWhat These Mistakes Cost to Fix - On Paper vs. After Framing
Every mistake above costs $0 to fix on a floor plan. Here's what they cost once the lumber is up:
| Mistake | Fix on paper | Fix after framing |
|---|---|---|
| No foyer / bad entry sight line | $0 | $2,000 - $8,000 |
| Bedroom too small for furniture | $0 | $3,000 - $12,000 |
| Broken kitchen work triangle | $0 | $5,000 - $15,000 |
| No mudroom / drop zone | $0 | $4,000 - $10,000 |
| Door swing conflicts | $0 | $500 - $2,000 per door |
| Master bedroom noise exposure | $0 | $8,000 - $25,000 |
| No usable wall space | $0 | $2,000 - $6,000 |
| Bathroom visible from public space | $0 | $3,000 - $10,000 |
| Undersized or missing pantry | $0 | $3,000 - $8,000 |
| Wrong solar orientation | $0 | $5,000 - $20,000 |
| Total potential exposure | $0 | $35,500 - $116,000 |
One afternoon reviewing your floor plan can save you $35,000 to $116,000 in post-construction fixes. That's the most valuable afternoon of your entire build.
How to Review Your Floor Plan Like a Builder
Before you sign off on your plans, do this 30-minute exercise. It's exactly what I do on every project:
- Print the plan at scale. Not on your phone. On paper, as large as you can. Tape the pages together if needed.
- Walk through it mentally. Start at the front door. Walk to the kitchen. Walk to the master bedroom. Walk to every bathroom. Does the flow make sense?
- Draw your furniture. Use the same scale as the plan. Cut out paper rectangles for beds, dressers, sofas, and the dining table. Place them on the plan. Do they fit?
- Check every door swing. Trace the arc. Does it hit another door? Block a toilet? Cover a light switch?
- Mark north. Where does the sun rise and set relative to your bedrooms, living room, and kitchen? Is any room getting hammered by west sun?
- Find the sight lines. Draw a line from every doorway through the opening. What do you see? The kitchen sink? A toilet? A blank wall?
- Test the kitchen triangle. Measure sink-stove-fridge. Is the total under 26 feet? Is any leg over 9 feet?
- Check for dead space. Long hallways, oversized closets you don't need, a formal dining room you'll use twice a year. Could that space be a pantry, mudroom, or bigger bathroom?
Take the floor plan to the actual lot. Stand where the front door will be. Face the direction you'll face when you walk in. Imagine the rooms around you. This 15-minute exercise catches things that hours of screen-staring miss - especially solar orientation and how the house relates to the street, neighbors, and backyard.
For a complete list of what to check once construction actually begins, read my phase-by-phase inspection guide. And if you want to understand why some materials and finishes cost so much more than others, check out why offers for railings, staircases, and countertops vary so widely.
Build With Confidence From Day One
The Home Building Checklist Bundle includes 12+ detailed checklists covering every stage of construction, a budget tracker, and a materials list - 15 years of field experience in one download.
Get the Complete BundleFinal Thoughts
A floor plan is the DNA of your home. Every wall, every window, and every door is decided here - and once construction starts, changing them gets expensive fast.
The 10 mistakes in this article cost homeowners a combined $35,000 to $116,000 when caught after framing. Every single one costs $0 to fix on paper.
Don't rush the plan review. Don't sign off because you're excited to start building. Spend one afternoon with a printed floor plan, a pencil, and this article, and you'll catch problems that would have haunted you for decades.
The cheapest changes in construction are the ones you make before a single board is cut.
For more on making smart building decisions, check out my complete home building timeline to understand what happens at each stage, and my guide on the hidden costs of building a custom home so you know where the surprise expenses are hiding.